Jason A. Burdette
ESM 4984
Assignment #1
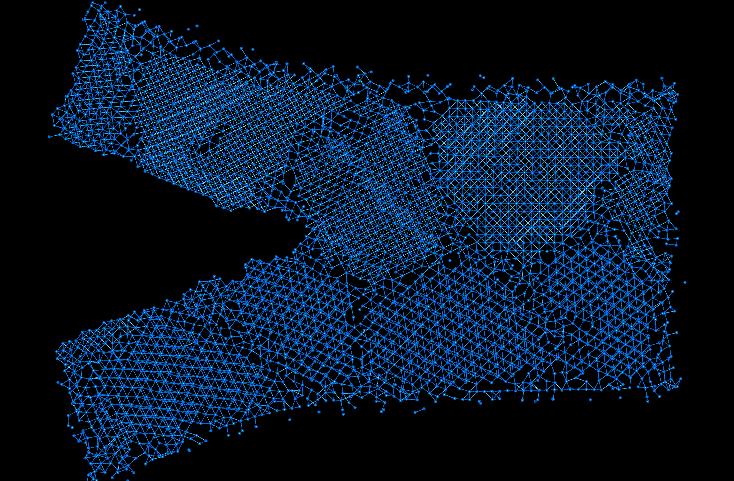
This document contains text and graphics describing a sample of nanocrystalline Nickel film containing a crack which is advancing under increased loading. The graphics depict individual atoms primarily oriented in FCC crystal lattice structure. Note that this sample is merely a slice of the object being subjected to loading so that only a thin layer of atoms are shown.
The material shown here is a nanocrystalline nickel film. Nickel is known especially for its superior corrosion resistance characteristics. For this reason, it is often used as a coating for metals which are more susceptible to corrosion. One of the most common examples of this is in stainless steels. In addition to this, some Nickel alloys are also used in industrial pumps, valves, piping and other components that may be subjected to corrosive effects of the solutions passing through them. Nickel is also commonly found in a class of materials called superalloys. Superalloys are designed to possess optimal property balances, to which Nickel provides corrosion resistance.
We’ll explore the structure of this particular sample step by step, zooming in a little closer with each view. Figure 1 contains the entire sample. The grain boundaries can be easily seen from this view as the dark regions separating areas of relative homogeneity. Also note how the atoms in different grains seem to be oriented differently causing the grains to look like they have different "textures" from this view.

Figure 1: View of entire sample
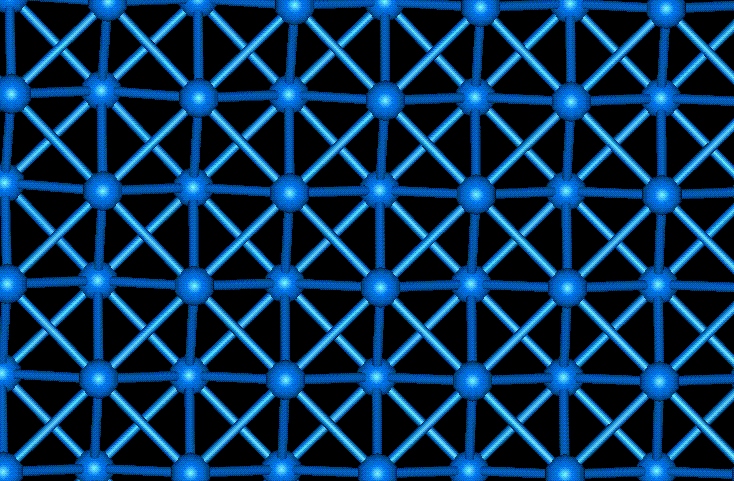
The individual grains shown above contain a large number of Nickel atoms grouped together in crystals containing FCC or face centered cubic orientation. These crystals appear in a repeating pattern constructing what is known as the crystal lattice structure within the grains. Figure 2 shows how these crystals pack together to form this symmetric lattice work.

Figure 2: Crystal lattice structure within a single grain
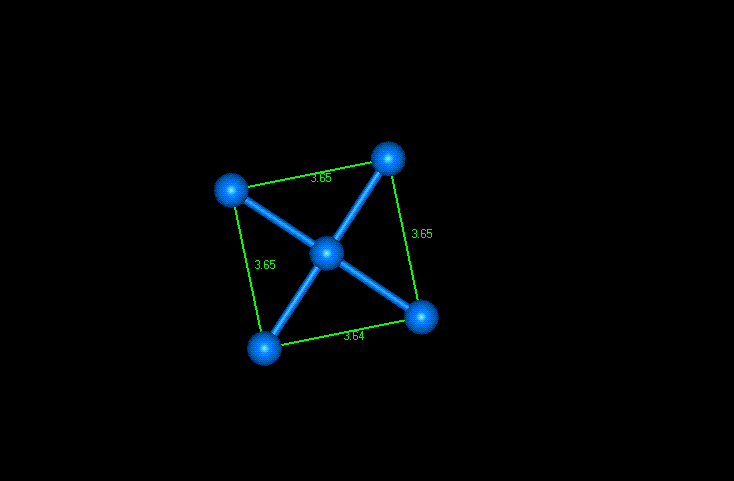
As mentioned earlier, the atoms comprising this lattice structure are arranged in cubes with atoms at the corners and at the centers of each face. This face centered cubic orientation was hard to detect in this example without deleting the surrounding atoms and leaving only the five atoms on one face of the cube. The length of the sides measured about 3.65 Angstroms using the WebLab Viewer distance monitor. This is reasonably close to the accepted value of 3.62 Angstroms. Figure 3 shows one side of the face centered cubic structure. I was unable to obtain the entire cubic unit cell as there didn’t seem to be a bottom layer of atoms to complete the cube. The thickness of the sample was not great enough to allow this.

Figure 3: Single side of FCC Nickel unit cell
Now that the general structure of the sample has been described, focus will be turned to its defects. First of all, the grain boundaries will be looked at more closely. Typically, when a metal, such as Nickel, fractures, it does so because grains slip away from each other along their boundaries. The grains on either side of the boundary often contain different crystalline orientations. In other words, the symmetry of the lattice network breaks down near the grain boundaries. Figure 4 shows a clear example of the symmetry within grains on either side of the boundary, but not across the boundary.

Figure 4: Grains separated by a grain boundaries
Zooming in closer still on the grain boundary offers more insight as to why the material fails along this division. Note the exact points at which the symmetry breaks down. You can see missing bonds, missing atoms, and even atoms "floating" freely with no bonds attached to them. Figure 5 shows some obvious examples of these phenomena, although many others can be detected by viewing other sections of the boundary.

Figure 5: Break down of atomic symmetry at grain boundaries
The last area of interest that will be analyzed in this report is the crack tip. When cracks are present, failure usually occurs because they propagate or get bigger as the load is applied. This mode of failure usually occurs instead of the grain boundary slip discussed previously. Figure 6 shows the tip of the crack in this sample. Note the broken or missing bonds around the tip. This is where local plasticity or yielding occurs.

Figure 6: Area around crack tip
The tools used for this analysis proved useful in that they provided the unique opportunity to interactively investigate the structure of the material and its defects. Although visual aids I have used to this point have offered an improvement over written descriptions, they were mostly 2-D "snapshots". The ability to rotate and zoom as well as removing atoms that were in the way afforded me a much greater understanding of what is actually happening within the atomic structure of the material.